Showing posts with label hand spinning. Show all posts

Tuesday, 31 January 2017

Hand spun, Naturally dyed Waistcoat

Hand Spun, Naturally Dyed Yarn

   The reason I bought a spinning wheel many years ago was to spin yarn for my weaving. Of course it takes time to reach an appropriate standard and along the way I have spun much yarn to use for knitted projects, some of it successful, some not appropriate for the intended finished item, but that's not unusual. There are many factors to take into account to be sure the yarn will behave as you want, and, if you are dyeing the spun yarn, well, that needs thinking about and sampling along the way.
   Spinning became a means to relaxation and a better night's sleep for one such as me, whose thoughts and planning seem to difficult to dismiss, continuing well into the night!
   The result has been many skeins of great yarn with no end product in mind. But they have been worth their weight in restful sleep!
   I am unable to wear most woolen products - being a sensitive soul :-)) - but have discovered that I can find some hope in organically prepared fibres.
   The 3ply yarn for this waistcoat was spun from organic falklands fibre, dyed with Walnuts hulls acquired from a tree in a garden just over the road from where I live. The tree has a preservation order on it along with another that stands in ground that once belonged to Poplar Farm, in Eaton Bray. The occupiers of the two properties are frustrated by the number of husks and nuts that have to be picked up from their gardens and without gloves this is a messy job which results in well stained hands.
   My request for bucketsful of  'walnut debris' was welcomed with some curiosity!
Chemical fixatives are not needed to achieve a permanent colour, so that was another plus for me.
   I was pleased with the shade of brown, deep enough but subtle at the same time.
A tension swatch made me realise that I hadn't dyed enough for a cardigan so I chose a modular knitted waistcoat of my own design.

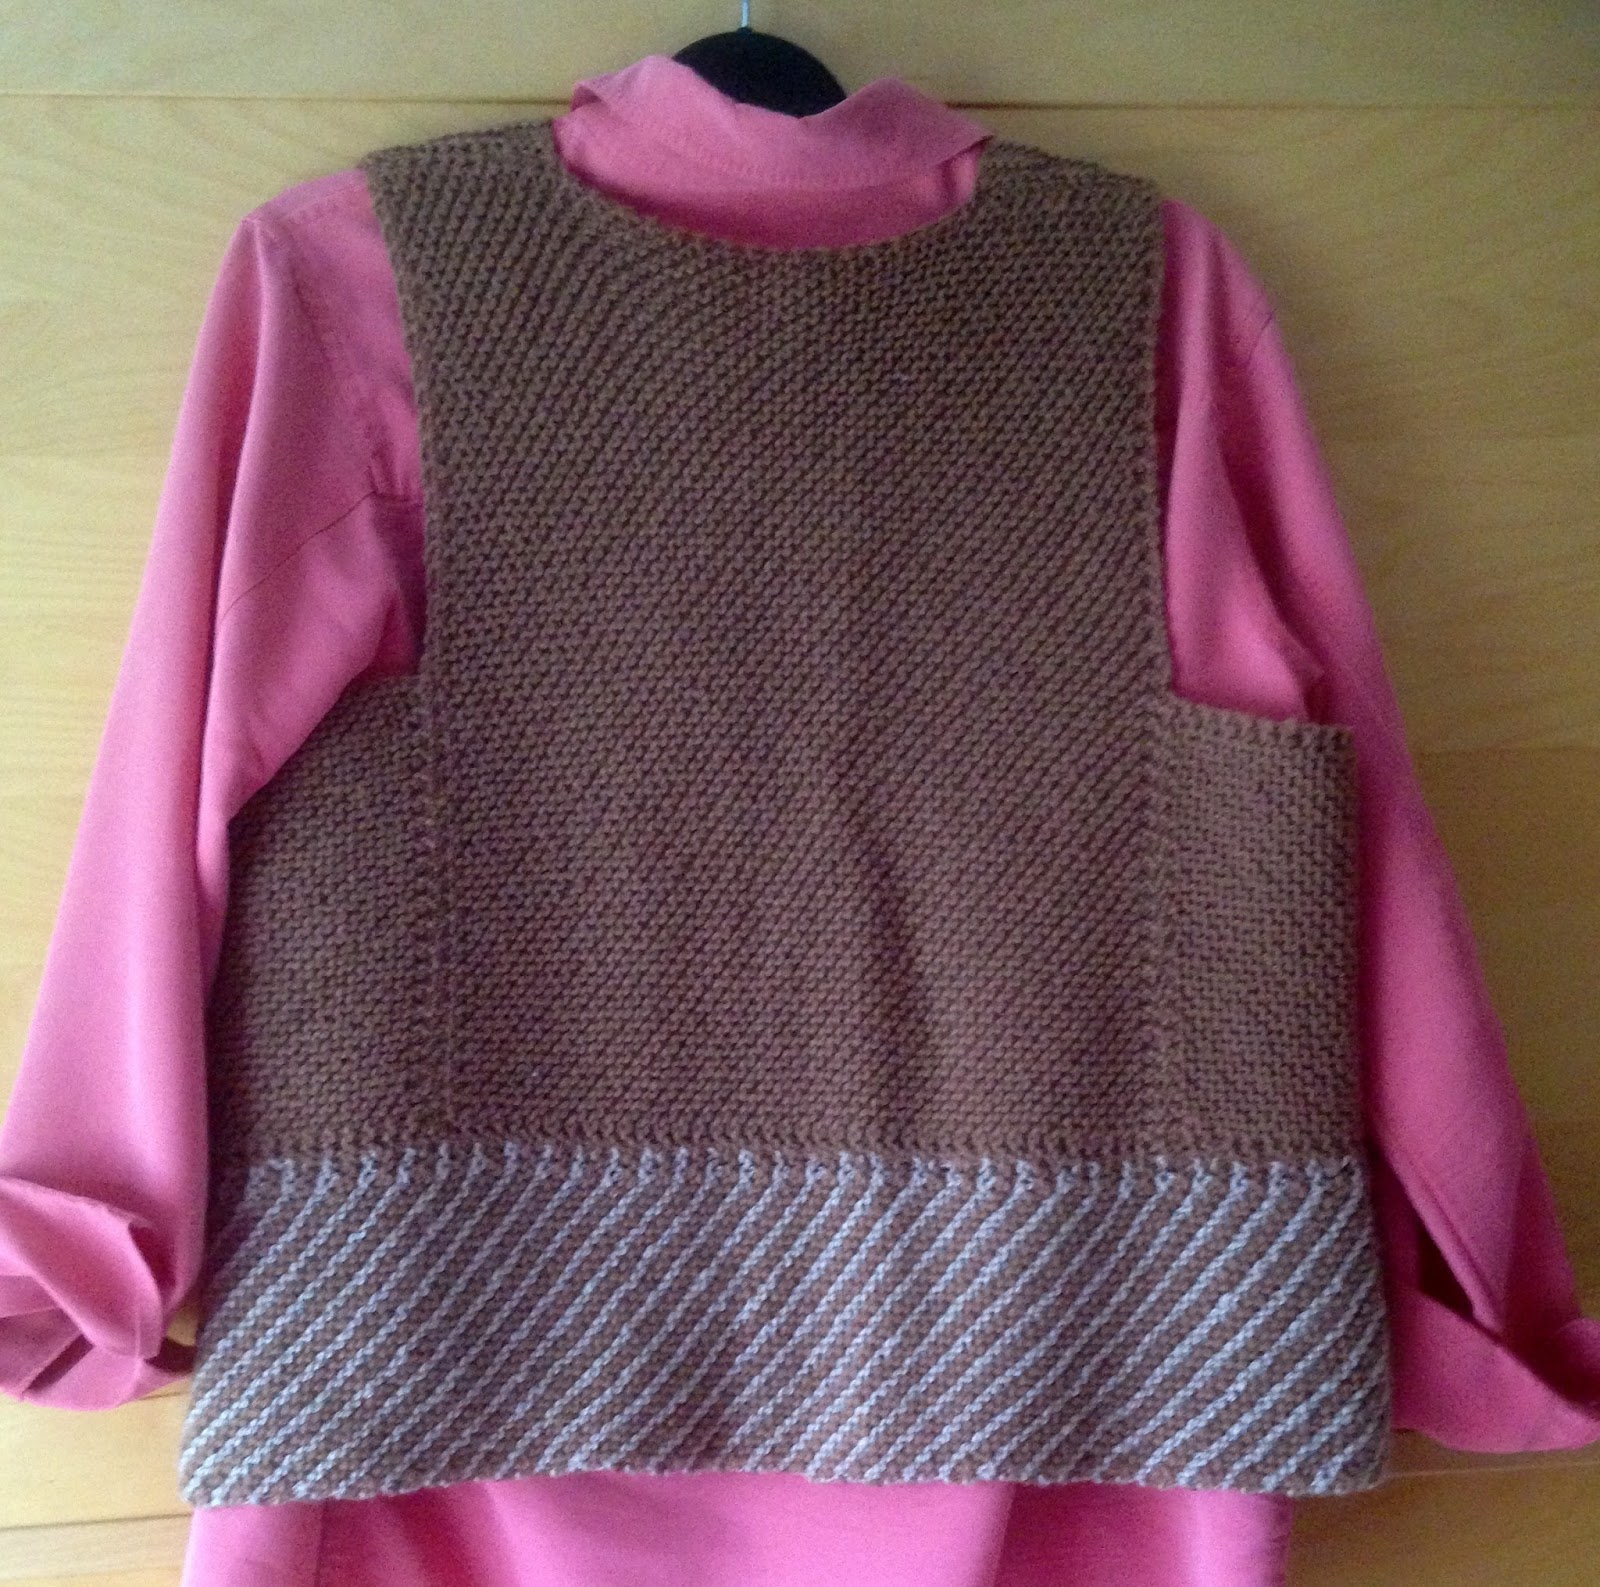
   I began with the front, and knitted on the diagonal to reduce/eliminate the chance of any sagging, until the piece was long enough to reach the outer shoulder line. I weighed that piece to calculate the weight of yarn needed for the front and back plus side panels and was very close to the weight of dyed yarn. With a slight panic over, this inspired a design opportunity!
   I knitted a band with alternating rows of a silk mix yarn, spun some time ago, with the walnut dyed wool. Hey presto!
   Now, I am looking for a suitable, possibly a bar brooch, to use as a fastening, either at the top or lower down the front.


Wednesday, 18 April 2012

Silk Tops


After spinning my own dyed silk bricks for several years I have become dissatisfied with the lengths of the fibres in the brick. It seemed to me that there were/are more batches of shorter and varied length fibres that were making the dyeing process difficult, caused by wastage because fibres along the length of the brick were breaking away, making it look very untidy and fibre loss.
At first, because I had spun little silk over the winter, I wondered if it was my technique at fault. Then I had reason to spin a brick that I had dyed some years ago. I found the fibre to be of a more consistent length and could control the style of yarn more easily. So, I hadn't imagined the change.
After trying two or three bricks I ordered silk tops. I spun a sample un-dyed and found the fibres to be more consistent and it was much easier to control the style/smoothness of yarn. Maybe I had hit on the solution to being disheartened about spinning my favourite fibre. Then came the test dyeing the tops.
I wound the very long length, 100g, of fibre on my niddy noddy just as I do with woollen yarn, put 4 figure of eight ties in the skein, soaked and dyed it.
It took less time to soak than a brick of 125g. First plus point. There was less fibre disturbance through the processes of dying rinsing and drying - second plus. It dried quicker because I was able to hang the length of tops across my dryer- third plus. Spinning was much more satisfying because I could spin a smoother,finer yarn without having to deal with batches of short fibres - plus four.
I have spun 100g of the 200g dyed and I am vey pleased that I can now resume a relaxing, satisfying process that I had enjoyed for so long.

I have woven several silk items since my last post and I am waiting for a bright, dry day to take photos. As soon as I have managed this I'll be posting again.

Monday, 5 March 2012

Another First


At the weekend I finished knitting this triangular shawl. It is my first completed project having spun the yarn on a drop spindle.
I have been drop spindling on and off for years but have never attempted, let alone completed, a project before.
Inspired by my friend Martina, also a member of Bedfordshire Guild Weavers, Spinners and Dyers, who carries her drop spindle almost everywhere and uses her spinning wheel rarely, I decided that I must complete something.
I began last autumn. I dyed 200g of wool tops with acid dyes and began to spin with the beautiful drop spindle bought at Fibre East last summer. Well, you can't spend over £30 on such a tool and just admire its beauty! It's so much more satisfying to make use of it.
The skeins above are the result. I was a little frustrated by the weight of plied yarn I could get on my spindle but next time I will follow Martina's advice and use a larger spindle on which to ply the singles.
The pattern is a free one from Ravelry 'Azzu's Shawl' published by Emma Fassio. Thank you Emma. I increased the number of rows, and therefore the width of the shawl, to use as much of my yarn as possible

Wednesday, 4 January 2012

A Personnal First


I have just finished a challenge I set myself back in August.
I was at the Association WSD Summer School in Musselborough and just had to buy something at the suppliers' fair. One stallholder had some dyed tops in colour combinations that I loved. I don't usually wear wool but have been searching for sometime for a 'woollen' fibre that I can wear close to my skin without irritation. There seemed to be little available that I hadn't already tried. What to choose? I decided upon something in merino and nylon, great for socks! I do wear woollen socks over my cotton ones when I am demonstrating weaving or spinning as I hate wearing shoes for this.
The yarn was spun soon after summer school but other things had priority.
I also wanted to see if I could produce a yarn similar but different to commercial ones that are self striping.
I separated the length of tops into its shades of pink, mauve and grey and then into two batches of equal weight so that I could spin the yarn in two skeins, one for each sock. I spun the colours in turn until the batch was finished, then Navajo plied each bobbin full of approximately 50g. I have found it easier to spin thinner singles lately and the yarn on the bobbin was going to give me a thinner yarn than I really wanted, so 3ply it was meant to be. I was able to keep the colours separate without any marling so I was confident that the stripes would be fairly well defined.
Two skeins of yarn spun, they were duly washed and dried, lovingly stroked and put with other skeins awaiting attention. They stared at me for 3 months! Then...
Over Christmas to New Year holidays I have found the time to tackle knitting the yarn.
Having worked out Wraps per inch, knitting a swatch with suitable needles, I had to find a pattern. Nothing I had was 100% suitable. So, I delved into 'The Twisted Sisters Sock Workbook', measured my feet, used their charts, adapted numbers of decreases/increases to suit and knitted my socks. They are comfortable and I am pleased that the stripes are comparatively even, sock to sock. I will not use their method for an hourglass heel with such thick yarn another time, as there seems to be lacy holes where three stitches are knitted together, but hey-ho! a girl likes to wear lace now and again! They will be keeping my tootsies cosy in the evenings now that winter has found us.

Tuesday, 15 November 2011

About Time too!


Well, it's such a very long time since I posted and I must try harder. It's not because I've not done anything but between computer problems and family events there has been no time to get down to it.
The above photo shows woollen skeins dyed in preparation for a workshop I am leading with two Weaving and Spinning groups next year. I started with the 3 primary colours, red, blue and yellow, and mixed them in set proportions to create secondary colours. In the workshops we will be mixing several colours, in pairs, to create a colour chart for Kemtex acid dyes. Hopefully in the future we will be able to choose the exact shades we want to use, rather than mixing in a hit and miss fashion, thought sometimes this is creative and gives combinations you may not have thought to combine. It surprised me just how many skeins are needed to do this with only an handful of dyes, so it will be great to get others to help each other create a useful shade card in a day.

Wednesday, 16 February 2011

Hankies not to be Sniffed at

Each year I buy silk cocoons to give to 'children of all ages' when showing and talking about silk and silkworms. Occasionally I make use of them myself in my craft work.
The silk can be reeled from the cocoons for spinning into yarn once the end, actually the beginning, of the fibre is found. The silk can also be 'harvested' another way. That is by making silk hankies. Here is a number of such silk hankies bought from a supplier.

This picture shows hankies that I have made recently in my endeavours to find the most efficient way to make these Mawatas (Japanese for stretched cocoons)and a quantities of ingredients for the softening/degumming solution.
The cocoons in this picture are little use for mawatas, they are 'spent', that is the moth has hatched and there is a hole in the cocoon, made by the moth on hatching. This may have caused the fibre to be broken. I may well try some in my experiments.
Spent cocoons are not used in the reeling process because of the collar of built up fibres and 'glue' (serecin, the gum produced by the silkworm to bind the cocoon fibre together). This could cause the fibre to break at the collar and make the process less efficient, but, as I am going to dissolve the gum, I may be able to produce adequate hankies.
Once my experimentation has produced enough hankies I propose to spin them into yarn. I may even dye the hankies before spinning the fibre.
Watch this space!

Wednesday, 15 December 2010

Not at a loss for things to do.


I have knitted the above items in the last couple of months, mostly from wool tops that I have dyed. The mauve stole was from carded fleece bought in Australia ten years ago. The last is the initial tension trial for a cable knit cowl. I have finished the cowl it was intended for but I will post that later as I've not yet taken a photograph.
Cables seem to feature large in fashion knitwear at the moment and I used to dislike cable patterns, stopping to pick up the cable needle frustrated my urge to get on with the project. Now that I can see the varied options I am more enthusiastic about the possibilities.
Having recently tried on a number of knit-wear items, from a very popular high street store, finding them to have a knitting fault in prominent places, I have decided that I should spin sufficient yarn to knit one myself. How long will it take? I have to get the fibre first, dye and then spin it. Shall I go more chunky than I usually do? The knitting would take less time, especially if I want to wear it while it is still fashionable. Something soft and snuggly is my aim!
I have embarked on a project/investigation, of my own, into the ways of using and combining, spaced dyed tops, hand and drum carded fibres and the results achieved.
The cowl mentioned above is part of this.

Wednesday, 14 April 2010

In the Mean Time

A new warp for the loom, along with it's weft, can take several days in the planning, preparation, dyeing and spinning. So
I am keeping busy with another project.
Rainbows are loved by everyone it seems and scarves with rainbow coloured warps are no exception. I have trouble keeping one for myself! It's also a great way to use up small amounts of dyed yarn.
Is it BRIGHT or is it bright?

The weft colour I have chosen, for the first of three scarves on this warp, is bright red and it does look a little bright but I do quite like it - cheery.
The next will be woven with a navy and the third.... still to be decided.

Once the loom was threaded I remembered a tip given me by my orriginal weaving tutor, Mike Halsey.
Tension of the warp threads is important to the weaving process. Slack threads can be caught by the shuttle and cause faults in the woven pattern but with 24 or 32 threads in each inch it can be a trial to get them all the same tension.
When the warp is tied to the front apron, there are gaps in the groups of threads and these need to be closed before weaving the 'real' cloth begins. It can take inches of weaving to achieve this unless..... you weave 4 or 5 rows tabby with a thicker thread, without beating them in place.

Once these rows are pushed into place the gaps close and any slack warp threads are shown up. Small discrepencies may need no more attention, especially on a woollen warp, but larger areas can be seen easily and dealt with, as can be seen at the selvedges of this warp.

Monday, 12 April 2010

One thing leads to another


Last weekend I was asked by our son's girlfriend if I could shorten the dress she had bought to wear at her sister's wedding which is about three weeks away. I replied in the affirmative.
When the dress appeared I became rather nervous. Satin, more expensive than I could afford, beautifully made and required all of my dressmaking skills to alter well. Would my sewing machine tension behave? Had I got a fine needle? I have been making clothes since the age of 13. Why was I so worried? could I have forgotten/lost all my dressmaking skills while I have concentrated on weaving?
The photo of the dress on a hanger doesn't do it justice. There is a slit in the back seam and the hem and facing are mitred. Our son thought I'd just fold, turn and stitch but I explained calmly that a good job required more time and they would not be taking away the dress that evening.
After three days I used all my courage, marked the hemline on dress and lining, zigzagged at the cutting line, machined up the lining and created the mitred corner to turn up the dress. The worst thing was cutting away the corner of fabric. What if I'd sewn it wrongly?? I don't like pressing satin because it could watermark, but I was saved this disaster. The last task was to hand sew the hem... what a relief. The job was done.
As I was working at this task, and considered the event it was to worn at and the fact that our weather is not too kind at this time of year, my thoughts turned to the beautiful colour of the satin and the colours I liked to see with this purple, cerise, plum, raspberry and lilac.
Today, I have dyed some silk fibre and yarn in those colours.


There is a breeze and the silk lookes a mess but is drying reasonably quickly. Maybe, I will be able to spin some of it tonight!
The result of these endeavours may be ready sometime next week, along, I hope, with a photo of the dress owner modelling.

Saturday, 27 February 2010

More Natural dyeing


I have been trying out some more natural dye extracts. I do like the gentle, somtimes subdued shades obtain with natural dyes but the results are not predictable as with synthetic dyes and that frustrates me somewhat. The time taken to get results is much longer too and I'm not sure how I feel about using them. I have enjoyed my experimentation though.
The first photograph shows shades obtained using 'Teal' which is an unknown formula and I am pleased with the range. The orriginal colour is on the left, then modified with, citric acid, soda ash, a paler shade of the orriginal and on the right the pale shade modified with iron.

This picture shows skeins, top to bottom, dyed with rhubarb root, the exhaust of the rhubarb dye and fustic. Fustic gave a very bright yellow. The dye comes from the heartwood of the dyer's mulberry, a large tropical tree from America.

Sunday, 14 February 2010

Natural Dyes


Members of The Online Guild of Weavers, Spinners and Dyers are taking part in a natural dye workshop this month. I am taking part, as I have been thinking for some time that I should know more about this subject. I have amassed a stash of chemicals for such a project over the years, as periodically I decide to work with natural dyes.
I have been nervous about their use and somewhat disheartened years ago when a spinner/natural dyer asked me to weave with some of her yarns. They were not very light fast and so the idea of natural dyes was rejected.
My main inspiration for starting to take time to use natural dye extracts, at this time is, my friend and fellow member of the Bedfordshire Guild, Jenny Dean. In the recent past she has dyed skeins of silk for me to weave into scarves and her knowledge on the subject is vast. She is a great support and adviser to me on this adventure. Thank you Jenny.
I have used three extracts so far, madder, Red Lac and Golden Doc, with the idea that the handspun yarn dyed with these could be used in a knitted item - but for whom? I cannot wear wool and I'm sure my dear hubby won't want anything in pink.
The skeins in the picture from left to right, Blue faced Leicester fleece and wool roving, type unknown, have been dyed with 5% madder, Golden dock, Red Lac and were previously mordanted with alum.
The process of bringing the mordant bath to the boil and simmering the dye bath seems to have changed and improved the yarn. It is a great deal more open and fluffy than the undyed. When I have spun more I must take a photograph to compare!

I have been busy.
The above skeins are spun with Merino roving, the colours blended with the Beds Guild WSD new drum carder. I have been practising with it so I can show other new guild members how to use it most efficiently. The small skein was spun straight from the batt of blended fibre and I have more to spin. The larger skein is a fancy yarn created by introducing slubs of the individual colours to one bobbin of the 2ply yarn.